Guidelines for using Zoom to create a virtual meeting, administrative staff
Please note: Until 15.7.2021, all zoom sessions recorded on the "Cloud" were sent to Panopto. From this date onwards all sessions will be sent to Zoom cloud and will be deleted after 30 days. Recordings can be transferred from Zoom cloud to a personal cloud and/or to a personal computer.
All administrative staff at the Hebrew University have an institutional license to work with Zoom. The institutional license allows users to schedule appointments for an unlimited time of up to 300 participants and to choose whether to record the sessions and edit them on Panopto.
Advanced Zoom and Panopto guides are available on the Yahel website (Hebrew)
Zoom:
Zoom is a software that allows users to create virtual meetings using their computers. The meeting will look something like this:

- The zoom session can be recorded and viewed again.
- A computer screen can be shared during a meeting
- And more options ...
Panopto:
Panopto is a recording software. At the university, Panopto is used to view recorded Zoom sessions.
Please note: Until 15.7.2021, all zoom sessions recorded on the "Cloud" were sent to Panopto. From this date onwards all sessions will be sent to Zoom cloud and will be deleted after 30 days. Recordings can be transferred from Zoom cloud to a personal cloud and/or to a personal computer.
Panopto recordings will be saved to a personal folder (My Folder) and deleted if not viewed for one year. (As of 15.7.2021)
The main screen in Panopto looks something like this:

Activation of Zoom and Panopto
Activation of a Zoom account can be arranged through your departmental coordinator or through the customer support department. Once your account has been activated, you will receive an activation email in the form:
From: no-reply@zoom.us
Subject: Zoom account invitation
Clicking the button: Activate Your Zoom Account, will activate your university Zoom license.

Shortly afterwards you will receive another activation email, this time to Panopto. Enter your primary university email address and password.
Using Panopto you will be able view your meetings recorded via Zoom (until 15/7/21), and you will be able to edit the recordings you personally uploaded.

Using Zoom
Installation and using Zoom
Make sure that Zoom software is installed on your computer.
If it is not installed, download it (from this address) and install it.
Go to https: https://zoom.us/signin and enter your primary university email address and password

After authenticatin, it is recommended that you verify on the profile page that your account type is listed as LICENSED

If your account type is defined as BASIC you will be limited to hosting sessions of under 40 minutes and with fewer than 100 participants.
Creating a Meeting
There are several ways to create a new zoom session (to be a "host"), here is one of them:
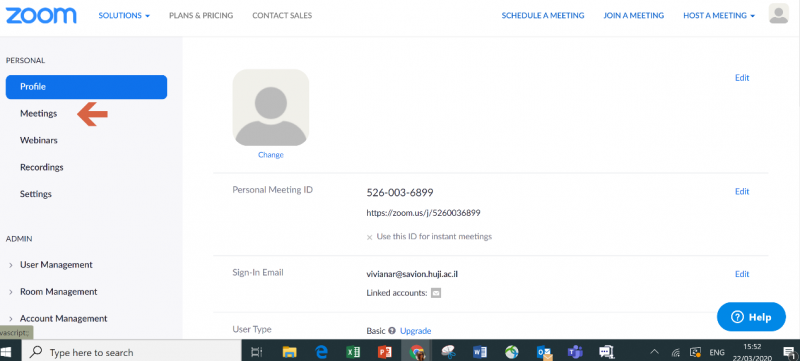
- Log in to the personal zoom account and go to the Meetings tab.
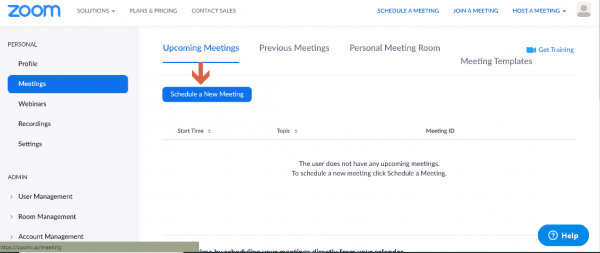
2. Click the Schedule a New Meeting button
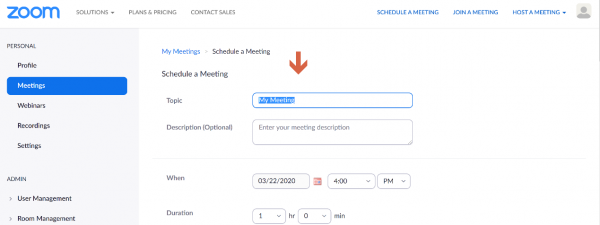
3.Fill in the details of the meeting (give it a name and enter an exact date).
Additional settings:
- You can set an entry password for the meeting - this is the default for administrative staff, this option is recommended in order to prevent strangers from entering the meeting.
-
You can permit participants to enter the meeting before the host. . Selecting this option will allow guests to log in and share information between themselves before the host begins the session.
-
You can set a "waiting room" - participants will enter the meeting only with the permission of the host. Selecting this option is recommended in order to prevent strangers from entering a meeting.
-
You can choose whether to record the meeting -If you choose to record the session record the session to your local computer.
4. Finally, click on the "Save" button.
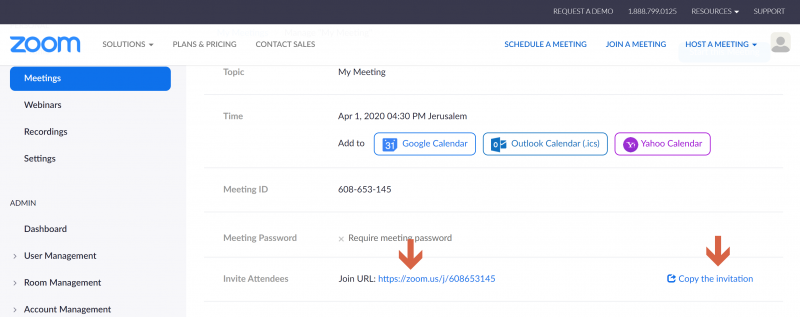
Creating an Invitation and Sending the Link to Participants:
Go to the meetings page: https://zoom.us/meeting and click on "Copy the invitation" (alternatively you can only copy the link shown to the left of the button Join URL) and send the link to the participants.
Starting the Meeting
Go to the meetings page and click on Start this Meeting

Turn on audio (microphone) and video (camera). At any time, you can turn off the camera and /or mute the microphone.

Managing a Meeting

- At any point in the conversation you can press Mute to mute yourself and Stop Video to stop the image transmission.
- To record the session, click the Record button.

There is an option to Record on this Computer, which means that the recording will be saved directly on your local computer. You can also save to your OneDrive or GoogleDrive.
A second option is to Record to the Cloud. If you choose this option the recording will be stored in the cloud https://zoom.us/recording
for 30 day. Afterwards it will be deleted.
- The participants' management window controls whether participants are muted or unmuted. By default, the microphone of all participants is open, but at any stage the host can change this mode for a particular participant or for everyone. To do this, click Manage Participants in the bottom toolbar and then click on Mute All, or select a participant from the list and mute him. During the meeting, the participants can vote and request permission to speak by clicking Raise Hand. In this case you will see an indication of the vote in the participant management panel. You can cancel voting by clicking Lower All Hands.
- Viewing documents, presentations and videos from your computer is done by clicking on Share Screen in the bottom toolbar, and selecting the window of the specific application that you want to share. You can also share a whiteboard for free writing on the screen.To stop sharing, click Stop Share.
-
Clicking on Chat will open a side pane that will allow messaging between all group members or individual conversations between two members.
When finished, click End Meeting for All
Using Panopto
Panopto is a recording software. Administrative staff can use Panopto to store recorded Zoom meetings.
Please note: Until 15.7.2021, all Zoom sessions that were recorded on the "Cloud" were sent to Panopto. After this date all recoreded sessions will be sent to Zoom cloud. They will deleted after 30 days. They can be transferred from there to a personal cloud and/or to a personal computer.
Panopto recordings stored in a personal folder (My Folder) will be deleted if not viewed for one year. (As of 15.7.2021)
The main screen in Panopto will look something like this:
Activation of Zoom and Panopto
Activation of a Zoom account can be arranged through your departmental coordinator or through the customer support department. Once your account has been activated, you will receive an activation email in the form:
From: no-reply@zoom.us
Subject: Zoom account invitation
Clicking the button: Activate Your Zoom Account, will activate your university Zoom license.
Shortly afterwards you will receive another activation email, this time from Panopto. Enter your primary university email address and password.
Using Panopto you will be able view your meetings recorded via Zoom (until 15/7/21), and you will be able to edit the recordings you personally uploaded.
you can edit files that were transferred during the past year,upload new files, download and share.
Entering your Panopto Account
Go to :http://huji.cloud.panopto.eu/
Academic Staff and Users with a primary email account in HujiMail:
In the following screen choose Moodle 20 and Click on Sign in

Authentication is via SSO. Authenticate with either your ID and personal code or using your HujiMail account.
Administrative staff with a primary email account on Savion:
Choose to authenticate with "Panopto" ; Authenticate with your Savion mail account and Panopto password (you can reset your password here)
Installing Panopto for Windows in Order to Create and Edit Recordings
Before you start, make sure you have plenty of disk space on your computer, since editing recordings requires.
System requirements
Operating system - Windows 8 and above
Browser - Requires the latest version of either Chrome, Firefox, Edge, Internet Explorer or Safari
Processor - Intel i3 processors are recommended for standard recording quality, Intel i7 processors for high recording qualities.
Memory - 4GB RAM Storage
Disk Space - Standard quality: about 135 MB per recording hour. High quality: about 540 MB per hour of recording.
Applications - Powerpoint version 2013 and higher is required for presentations
-
You can download the installation file while connected to Panopto. On the right hand corner of the page click on Download Panopto
![]()
-
Run the downloaded file (PanoptoRecorder.exe) and start the installation process
-
If the following error occurs:

Select Install anyway
5. In the next step, select the path for installing the software and the path for saving the recordings (as specified - note that there is enough storage space for saving the recordings), when finished click the Next button
6. On the next screen, click Install to start the installation

7. At the end of the installation, the software can be run.
8. When you first enter the Panopto system, select Sign in

9. If you are not registered, a registration page will open, select the HUJI MOODLE selection tab, click OK, and you can now open Panopto.
10. A pop-up window will then open in which you will select Open link , Panopto Recorder must be checked

Viewing my Recordings in Panopto and Saving them to a Local Computer or in the Cloud
In July, 2021 the agreement with the Hebrew University and Panopto was renewed. Within this agreement the university is requried to greatly reduce the storage volume on Panopto, to delete unused material, and to stop the automatic storage of meetings that are not required. Therefore starting from 15.7.2021 material in My Folder in Panopto that is not viewed for an entire year will be deleted with no possibility of restoration. We request to delete the material or transfer the material to your local computer or the the cloud One Drive/GoogleDrive
Entering your Panopto Account
Go to :http://huji.cloud.panopto.eu/
Academic Staff and Users with a primary email account in HujiMail:
In the following screen choose Moodle 20 and Click on Sign in
Authentication is via SSO. Authenticate with either your ID and personal code or using your HujiMail account.
Administrative staff with a primary email account on Savion:
Choose to authenticate with "Panopto" ; Authenticate with your Savion mail account and Panopto password (you can reset your password here)
How do I see the Contents of MyFolder in Panopto
The recordings are uploaded to the personal Panopto folder MyFolder. The folder can be choosen from the side menu on the left side, Some of the recordings will be uploaded to the folder MyFolder or to the subfolder Meeting Recordings. that is under the folder MyFolder.

In the Panopto screen, move the mouse over the desired recording. Highlighted options will appear next to the recording. You can delete, share, edit and save the recordings by selecting the desired option.

Deleting a Recording:
Delete any recording you do not need, by pressing the "Delete" key.
The recordings will be deleted automatically if not viewed for an entire year.
Saving a Recording:
You can download the recordings that are important to you to your personal computer and/or to a network drive such as Google Drive (academic staff) or One Drive (administrative staff).
If your drive (in the cloud) is synchronized with the computer, you can select it, otherwise save locally and then upload to the cloud, in the Web interface.
Save a recording to a computer as shown in the video settings screen. vide
In the Panopto screen, move the mouse over the desired recording, the highlighted options will appear next to the recording.
Click on SETTINGS and you will get the following screen:

Press on Outputs

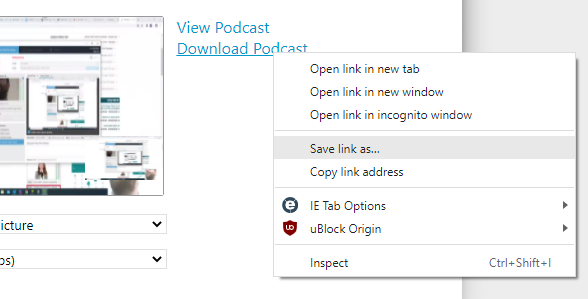
To save to your local computer, click Download Podcast.
To save to a cloud drive, right-click Download Podcast

Choose Save link as...
Save the recording on the ONEDRIVE drive for administrative staff

Select the local OneDrive folder to save the recording file.

As long as the file mark is the Panopto loading arrows ![]() , the computer has not finished uploading to the cloud.
, the computer has not finished uploading to the cloud.
When the file finishes uploading to the cloud, the icon changes to ![]() . Uploading the file can take several hours.
. Uploading the file can take several hours.
Transfering Recordings from a Personal Folder in Panopto
You can transfer a recording from the Panopto site to your local computer drive or network drive
Academic staff can transfer to their HujiMail drive. Administrative staff can transfer to their the OneDrive drive which is linked to the Savion account. Each user has 1T drive space available.
(This drive is only available for the time period that staff members are employed at the university)
Linking Cloud Drives to a Computer in order to transfer a Panopto Recording
To save personal files and recordings, you can link a cloud drives on your computer as a regular drive for synchronization and ongoing work.
For example - in July 2021 you were asked to transfer recordings from the personal folder in Panopto to the cloud - you can transfer a recording from the Panopto site to the local drive on your computer or to the network drive that is set up similar to a local drive.
Academic staff can use their on HujiMail drive.
Administrative staff to a One Drive drive linked to the Savion account. Each user has 1T drive space available.
(This drive is only available for the time period that staff members are employed at the university)
Linking a Cloud Drives to a Computer
Setting up a HujiMail drive for academic staff (Google Drive)
Instructions for using a Google Drive can be found in the link: https://ca.huji.ac.il/book/google-drive
Setting up OneDrive, Administrative Staff
We have opened a network drive with storage up to 1T connect to your Savion account.
You can set up a drive on your computer that is directly linked to your network drive using OneDrive software.
Windows users, click the Start button, search for OneDrive, and then open it.
After a few seconds an identification window will open. Enter your Savion email address, then click sign in

Choose the location to store the Drive material on your local computer and click on Next

Define which directories will be backed up on the drive, then click "Continue",
Remember - your drive will be deleted at the end of your university emplyoyment, so it is recommended to keep a minimum of material on your drive. You are encouraged to unmark the folder markings. Click on Continue.

Click on Next

You now have a local drive connected to OneDrive

Saving a Recording:
You can download the recordings that are important to you to your personal computer and/or to a network drive such as Google Drive (academic staff) or One Drive (administrative staff).
If your drive (in the cloud) is synchronized with the computer, you can select it, otherwise save locally and then upload to the cloud, in the Web interface.
Save a recording to a computer as shown in the video settings screen. vide
In the Panopto screen, move the mouse over the desired recording, the highlighted options will appear next to the recording.
Click on SETTINGS and you will get the following screen:
Press on Outputs
To save to your local computer, click Download Podcast.
To save to a cloud drive, right-click Download Podcast
Choose Save link as...
Save the recording on the ONEDRIVE drive for administrative staff
Select the local OneDrive folder to save the recording file.
Choose Save link as...
Save the recording on the ONEDRIVE drive for administrative staff

Select the local OneDrive folder to save the recording file.

While the icon is displayed with the arrows the recording has yet to be uploaded to the cloud.
When the icon changes to the following: ![]() the file has uploaded.
the file has uploaded.