MyPlace
In the summer of 2020, an upgraded system for work from home was launched for administrative staff and students.
The system simulates a virtual machine with a work environment suitable for the staff (administrative software) or students (with the same applications installed on public computers).
The system replaces the Corona system established in March 2020 for staff and the MyDesktop system used by students.It allows for access of personal network drives, shared drives and software required for administrative staff and students.
Alternatively, administrative staff can access each service individually. For more information click here.
Connecting to MyPlace
Before connecting to MyPlace one most first connect to the University networking via the Rumba VPN service (recommended) or through installation and connection to Samba VPN Administrative staff are required to authenticate with a onetime password generator. For those who do not have a one-time password generator, they can obtain a one time password via sms..
You can connect to myplace.huji.ac.il via a browser or install a one-time VMware Client software that may be more convenient and solves resolution problems.
Connect to Myplace.huji.ac.il through the browser
Login with Vmware Horizon Client software
Instructions for use for Administrative Staff
To enter the MyPlace site you will be asked to provide a username and password. Please enter your Savion username (not the entire address, only the part before the @) and password.
After logging in, you will receive a computer screen similar to the one pictured below. You can use any of the software or use additonal software in the MagicXpa folder.
Please note Rakefet or Humble users, before first time use, please run the file called "First Use Powerterm" . It is found in programs bar found by pressing on the windows icon on the bottom left corner of the screen or you can search for it.

Viewing EKMD Personal and Shared Drives
1) If you wish to view a EKMD drive click on the desktop icon

If requested enter your EKMD username and password, otherwise go to Step 2
2) Open File Explorer using the yellow folder icon at the bottom of the screen

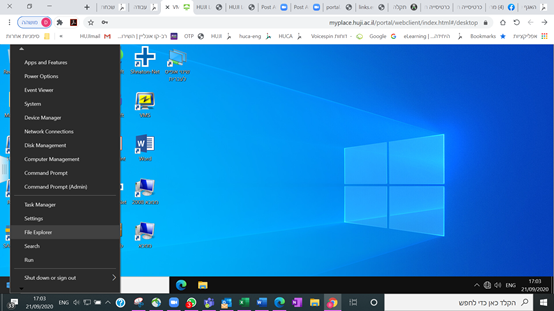
Or right-click on the computer icon in the corner of the screen, select File Explorer

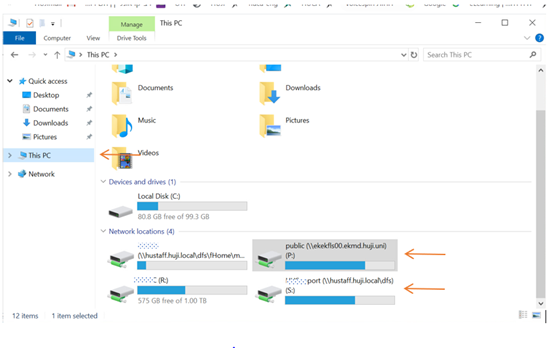
3) In the window you receive, select This PC and you will see the mapping to the personal and departmental drives linked to the username you entered.


